
This page discusses how to request the conversion of multiple licenses into one license through the DCC Cultivation Licensing System (CLS). The process enables a Designated Responsible Party (DRP) for multiple licenses to consolidate them into one primary license. This will be the converted license.
Note: As of January 1, 2023, multiple licensed and previously licensed premises can be consolidated into a single Medium or Large Cultivation License provided they have the same owners and at least one license is currently active.
Request license conversion
Here is an overview of the process we will cover for converting your licenses:
- Enter licenses: Select licenses to be included in the conversion request
- Add owners: If ownership has changed, submit a Notification and Request to Modify a License form before requesting a conversion
- Review premises information: Review and update each premises’ water and power source, as needed
- Upload required documents
- Pay the license fee: Conversion license fees are prorated according to the amount of time remaining on the original license
- Access and print your consolidated conversion cultivation license
Begin conversion request
Log into the Cultivation Licensing system. Click the New Application or Conversion Requests button on the My Dashboard screen.
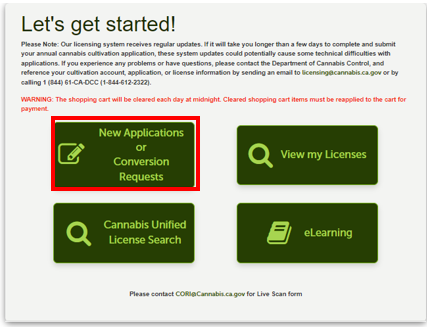
Log into the Cultivation Licensing system. Click the New Application or Conversion Requests button on the My Dashboard screen.
General disclaimer
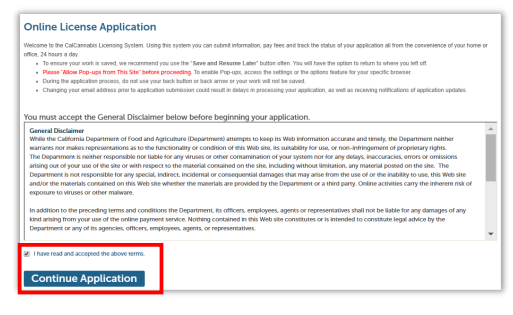
Click the box to accept the application terms, then click Continue Application to proceed.
Application type
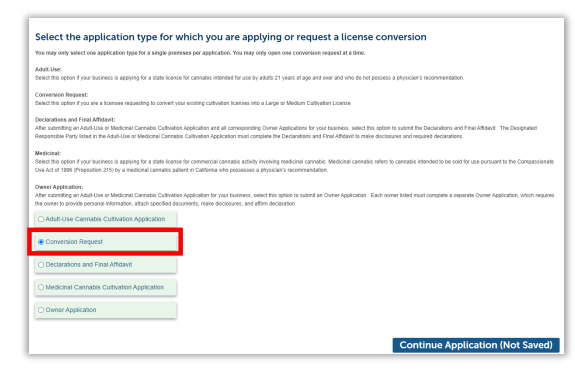
Select Conversion Request.
Click Continue Application (Not Saved). There will be a chance to save your work soon).
Primary license record
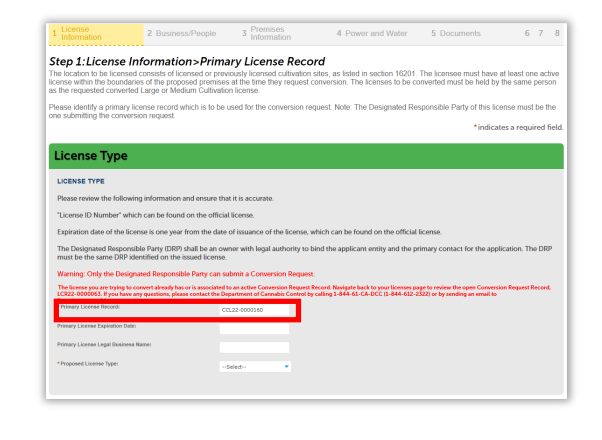
Enter the license number of the first license you wish to convert in the Primary License Record field. The license you select as Primary can be in an “Active” or “About to Expire” status.
Note: Nursery or Processor type licenses may not be used as primary licenses for conversion. Only the Designated Responsible Party can submit a Conversion Request.
The system reviews the license number you just entered to verify validity for use as your Primary License Record.
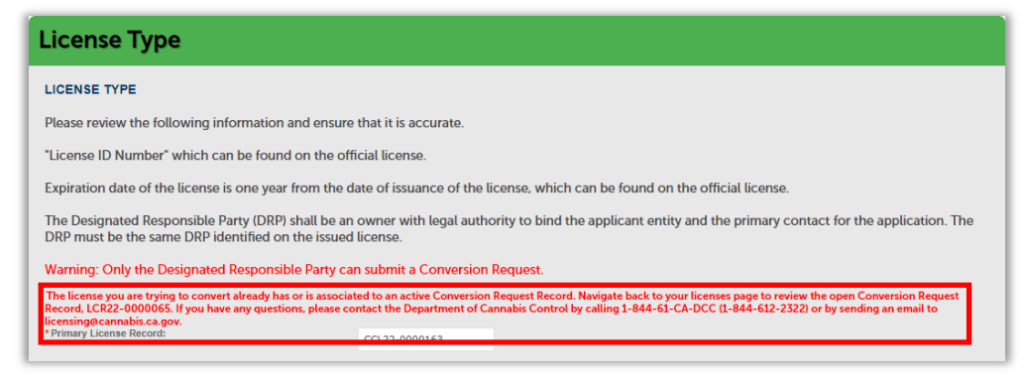
If ineligible, red text displays explaining why the license is unusable.
For example, if the license you entered was already requested for conversion, the message says: “The license you are trying to convert already has or is associated with a live Conversion Record request.”
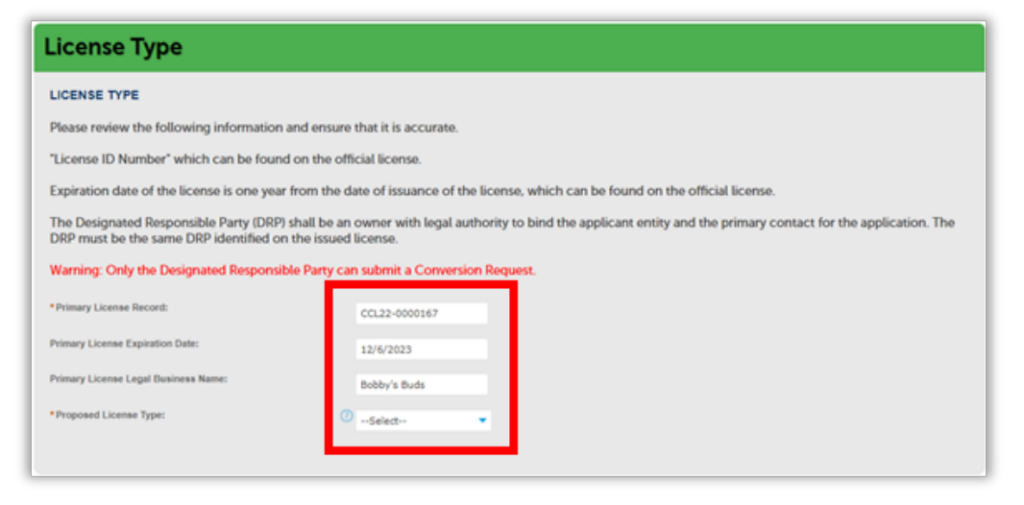
If the record is eligible for conversion, the Primary License Expiration Date and Primary License Legal Business Name automatically populate for you.
Note: You may only convert licenses of the same lighting type. For example:
A Large Mixed-Light Tier 2 Primary License can be consolidated from multiple Mixed-Light Tier 2 licenses of any size. Other lighting types, such as Outdoor, cannot be included.
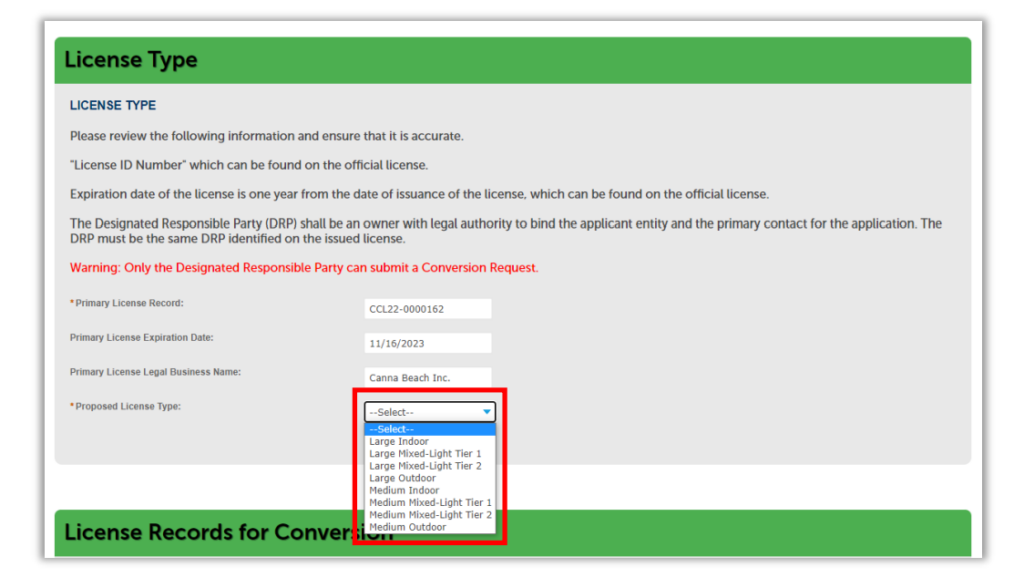
Select the Proposed License Type from the dropdown.
Choose one of the eight different conversion license types listed.
License records for conversion
Enter the additional license(s) you wish to include in the consolidated license.
Note: There is no limit to the number of licenses that can be converted into a Large-size license, unless your Proposed Primary License type is Medium-size. Then the total canopy size of all converted licenses must not exceed the maximum canopy size for the Primary Medium license.
Enter licenses individually or enter up to 10 licenses at a time.
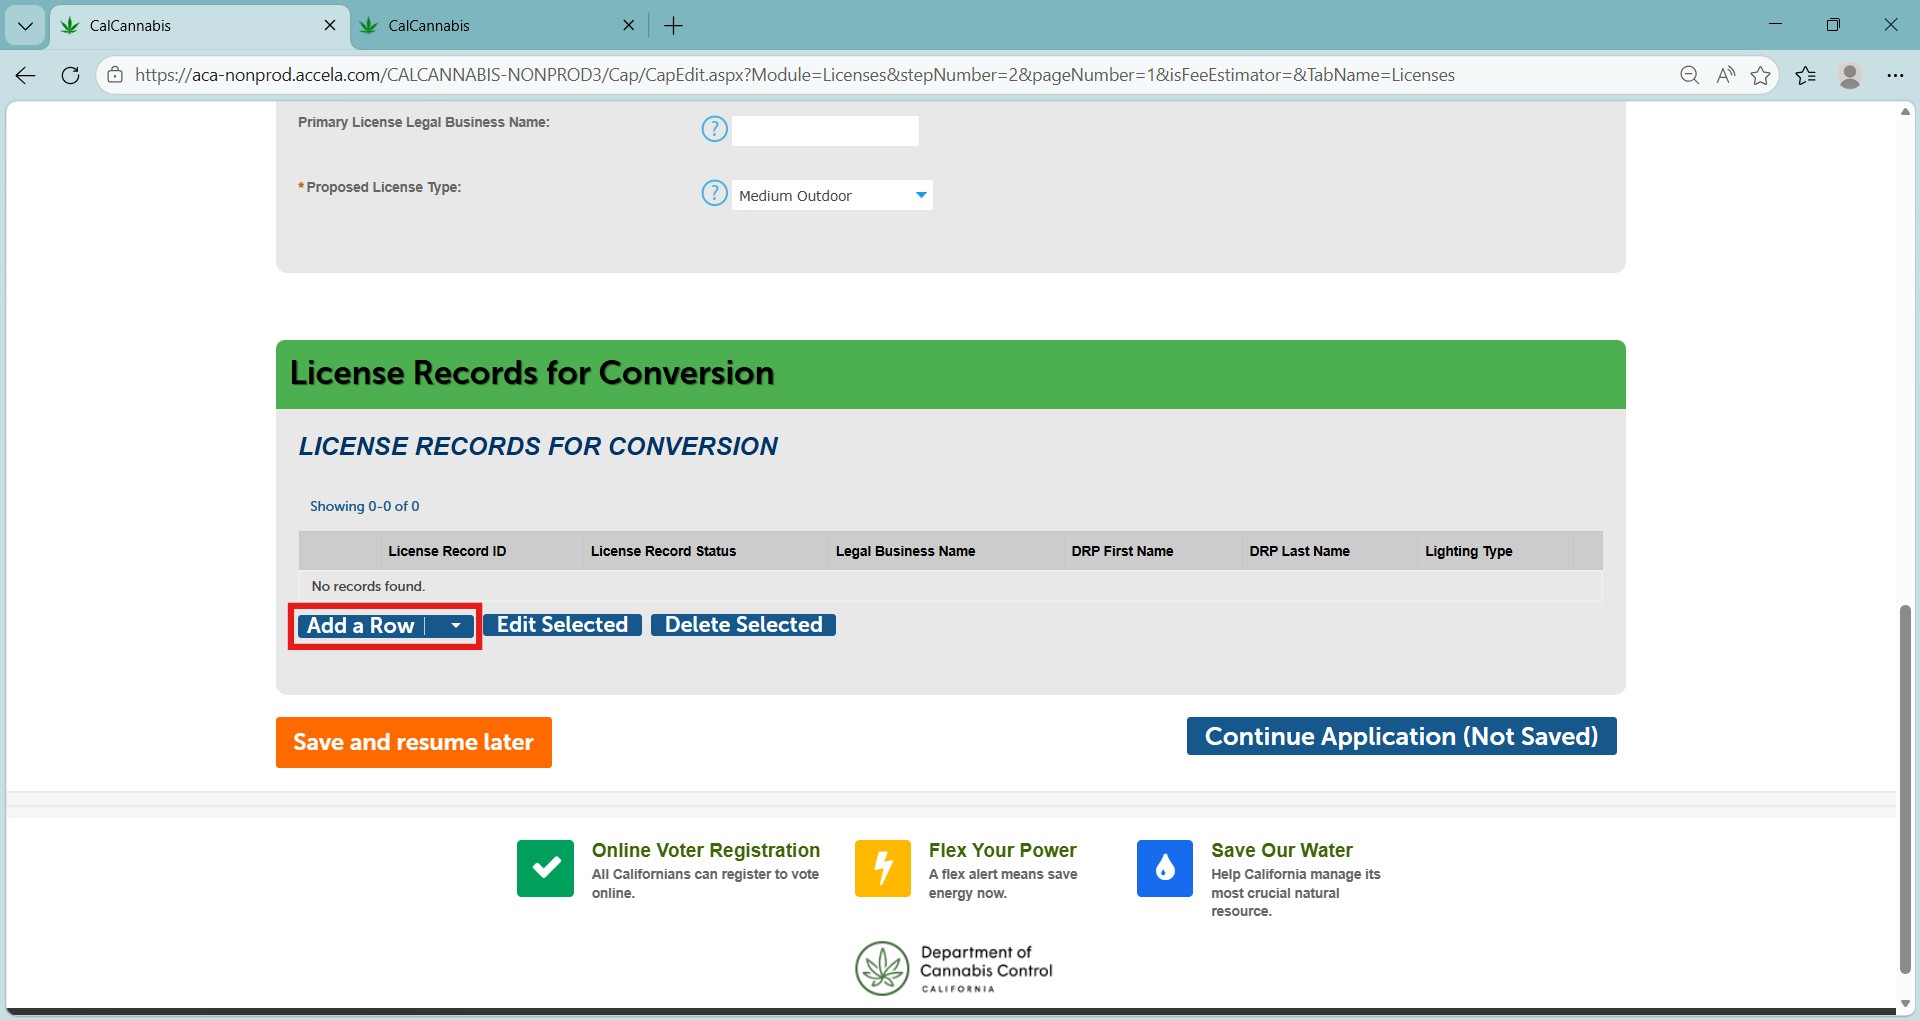
Select Add a Row to individually enter each additional license.
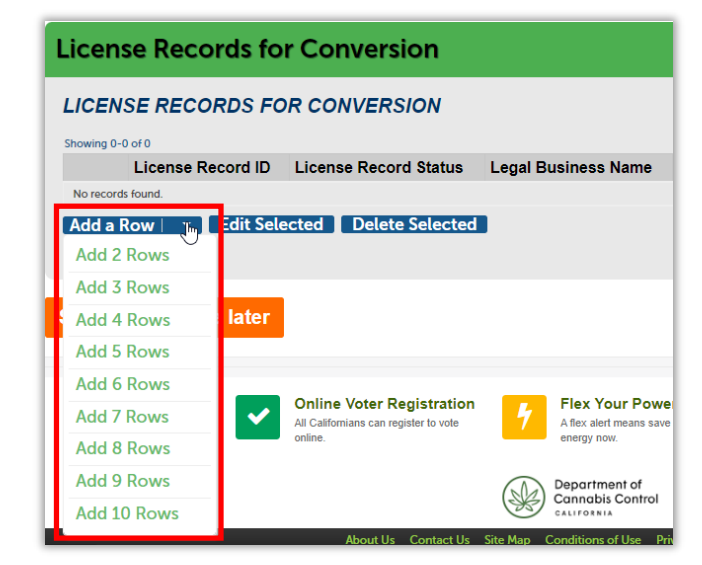
If you need to ender more than ten, click the arrow to the right of the button and choose to add up to ten rows at a time.
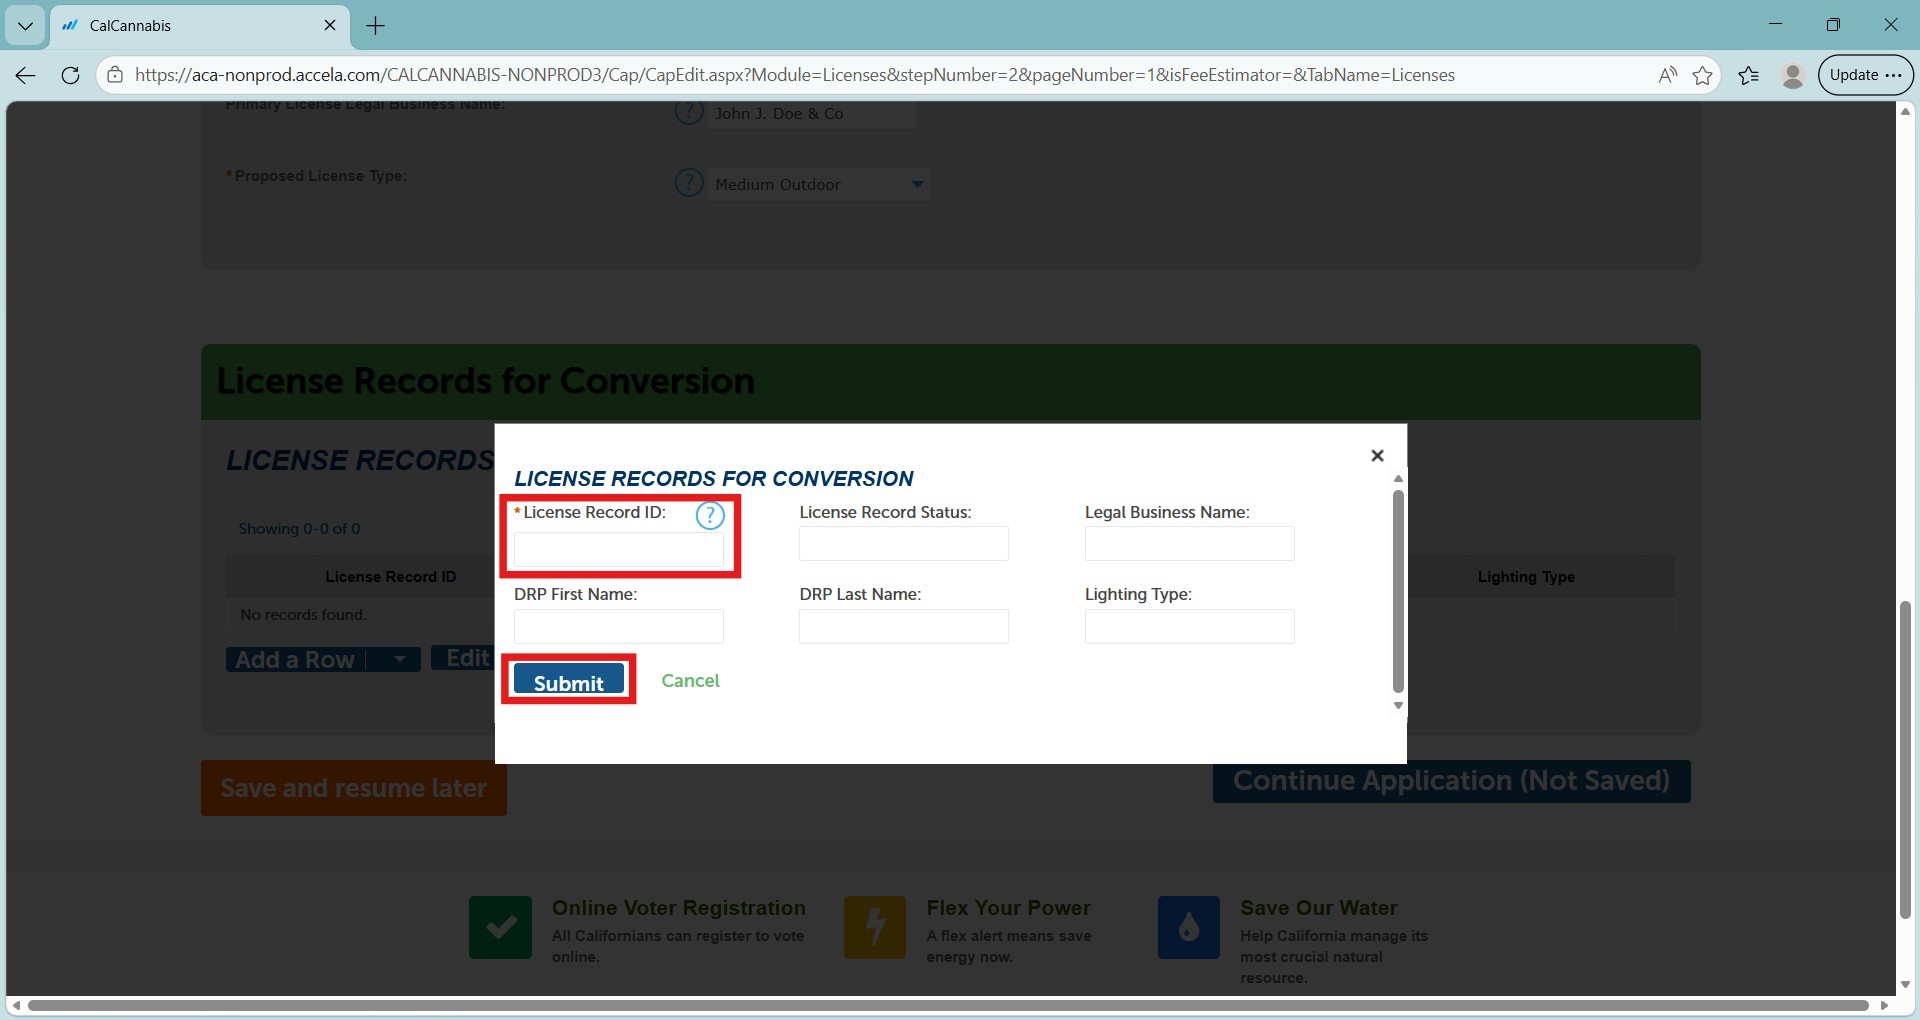
Enter the license record ID number (the license number) of each license to be converted. Each License Record ID is checked to ensure it meets the conversion criteria.
- If it is valid, the remainer of the information will automatically populate. If it is invalid, red text displays the reason.
- Select the Submit button to save the information when complete.
If you need to add more than 10 licenses, selecting the Add a Row button again brings up another dialogue box to add more.
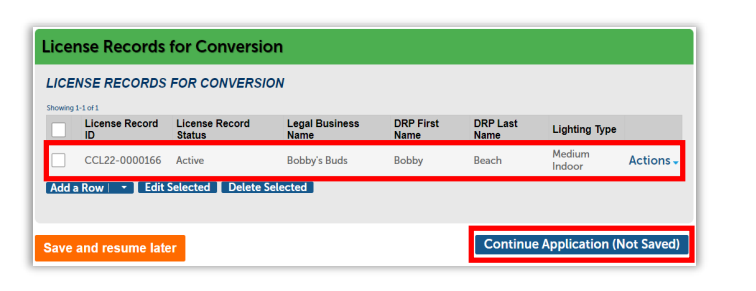
The information displays in the License Record for Conversion section. Click Continue Application to proceed.
Note: If you need to leave and return later, select Save and Resume later. The unfinished conversion request will be listed in your My Licenses list.
Business and people
Owners
This page displays all owners listed on the original licenses.
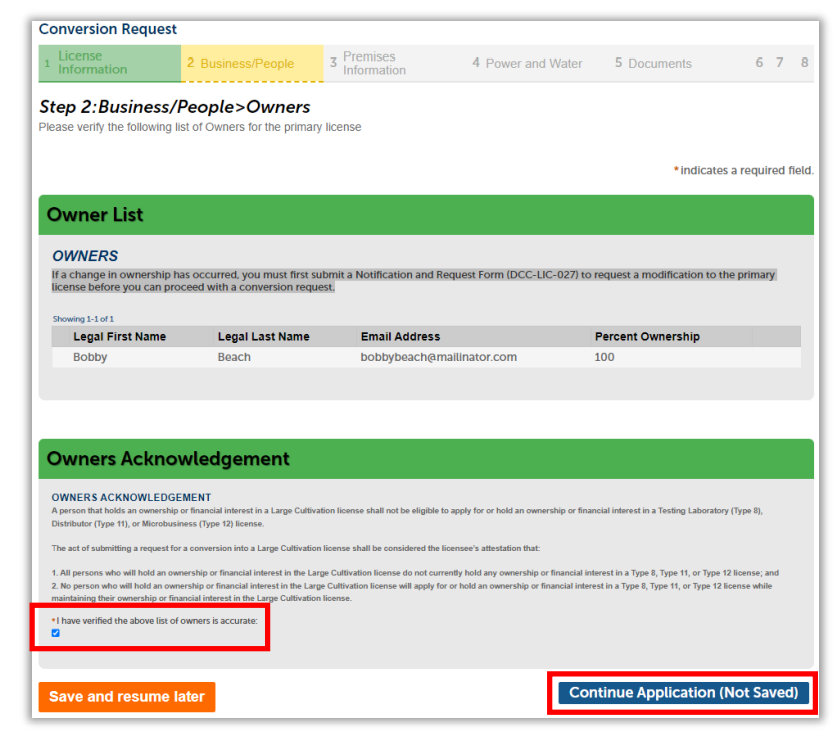
Select the checkbox labeled “I have verified the list of owners above is accurate” to confirm you have reviewed the Owner List.
Click Continue Application.
Note: If a change in ownership has occurred, you must submit and be approved for a Notifications and Requests to Modify a License Form (DCC-LIC-027) before proceeding with a conversion request.
Financial interest holders
Add any additional persons or entities holding a financial interest in the company. Definitions for Financial Interest holders are listed at the top of the screen.
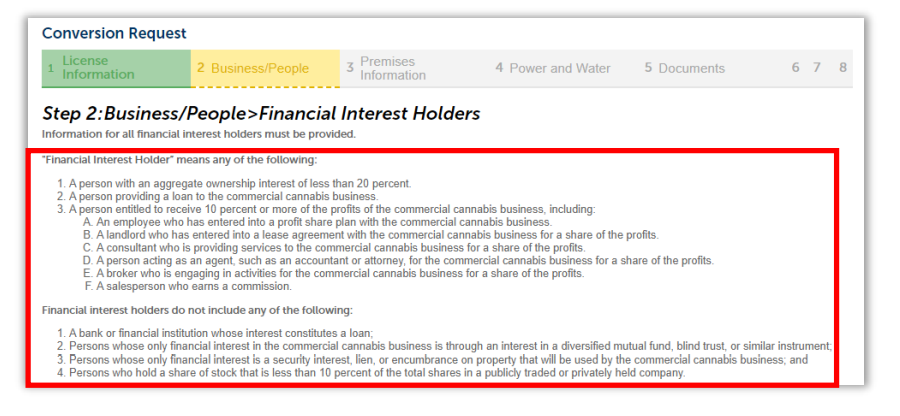
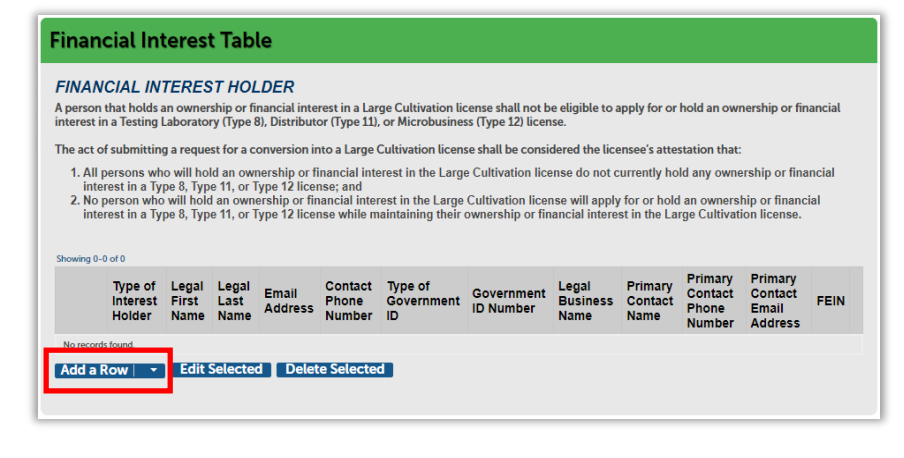
Select Add a Row in the Financial Interest Table to add a Financial Interest Holder. You can skip this step by clicking Continue Application.
Select Add a Row or use the dropdown arrow to add up to 10 people at a time.
The information required depends on the type of interest holder selected.
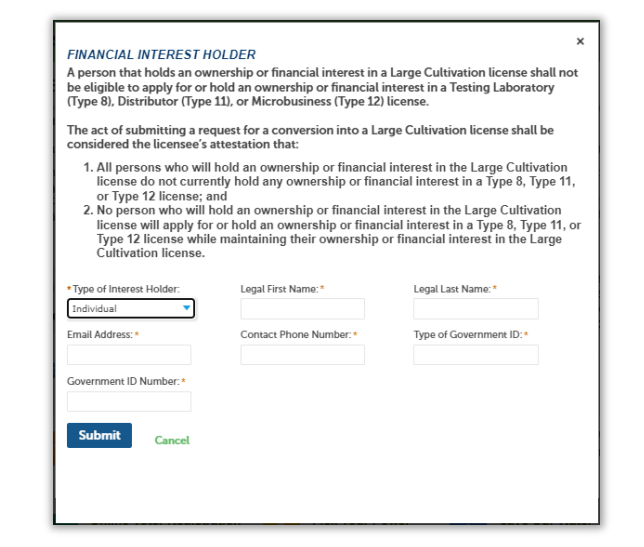
Select either Individual or Entity from the “Type of Interest Holder” dropdown, then enter the required information. This information depends on the selected type.
When finished, click Submit.
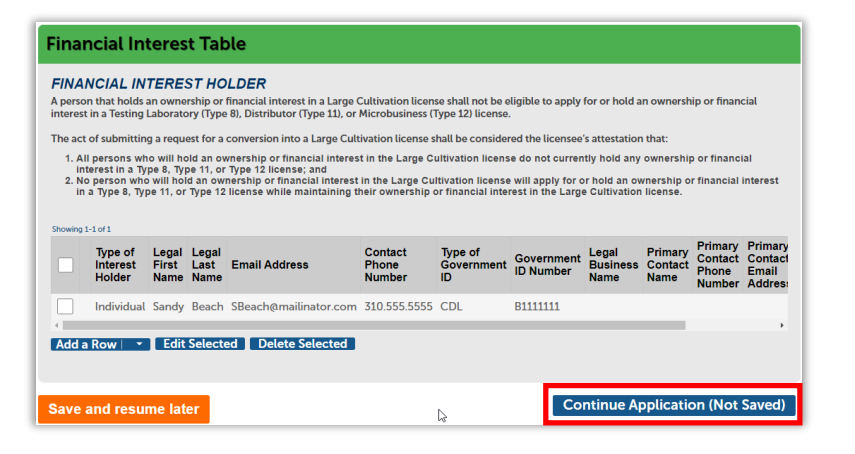
The list of added Financial Interest Holders displays in the Financial Interest Table.
Click Continue Application.
Premises information
Next, review the premises information for each parcel in the converted licenses.
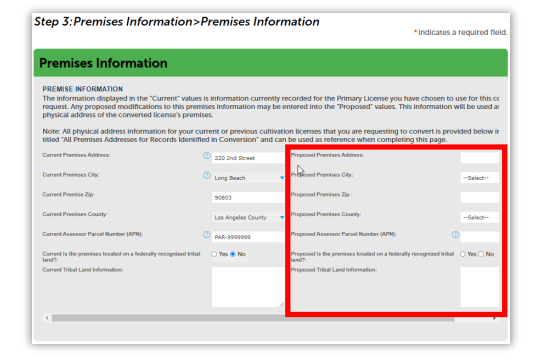
The first section, Premises Information, shows the address for the Primary License number entered in Step One.
Use the Proposed Premises fields on the right to make updates if any information for the Primary License Record has changed.
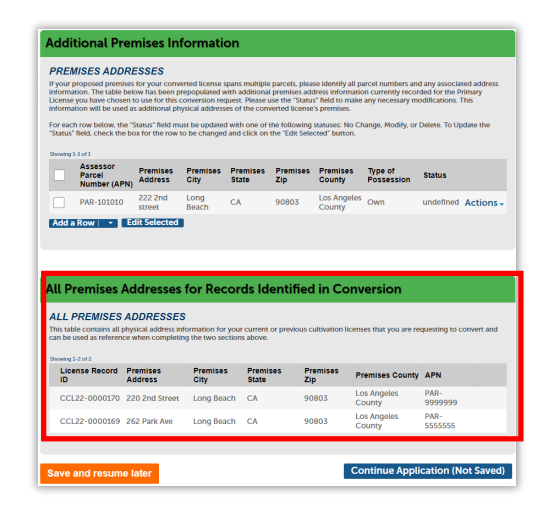
Review and confirm the additional premises addresses in the Additional Premises section.
Add additional premises information
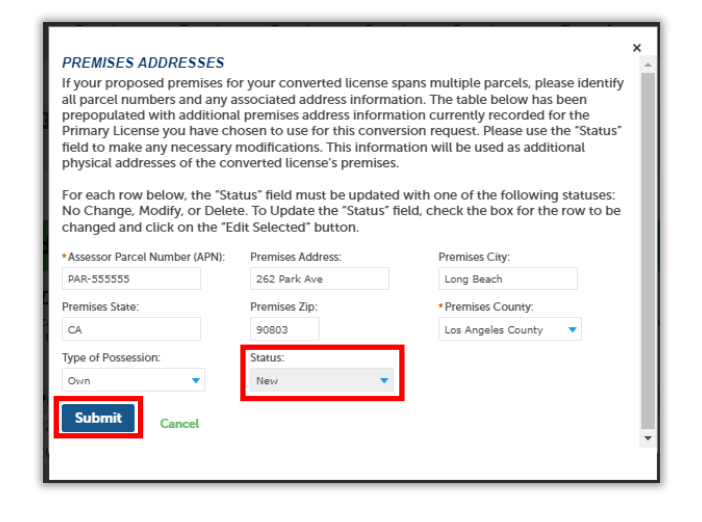
Enter the necessary parcel information. The status field automatically defaults to “New” for all newly added parcels.
Click Submit when complete.
Note: When editing existing premises information, you must update the status dropdown to “Modify” before clicking the Submit button.
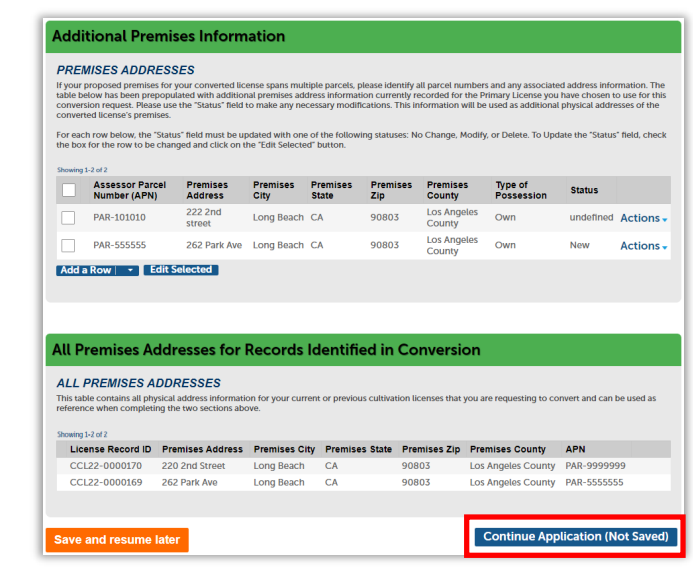
Once all premises information has been added, click Continue Application (Not Saved) to proceed to the next section.
Power and water
In the next few screens, you will review and update power and water sources.
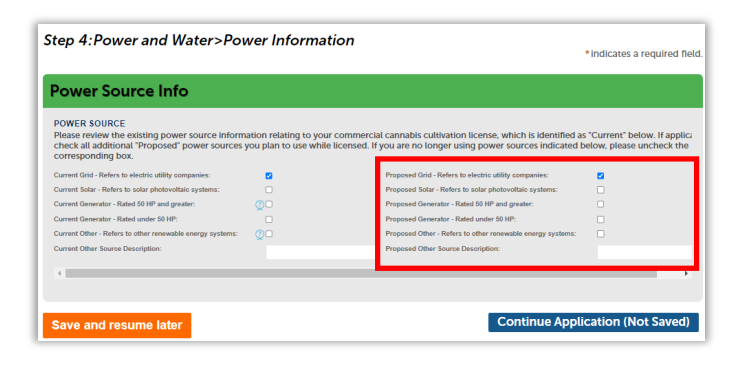
If the power source has changed, update it using the “Proposed” checkboxes in the right-hand column.
If no changes are needed, select Continue Application.
Water information
The current water information for the Primary License displays on this screen.
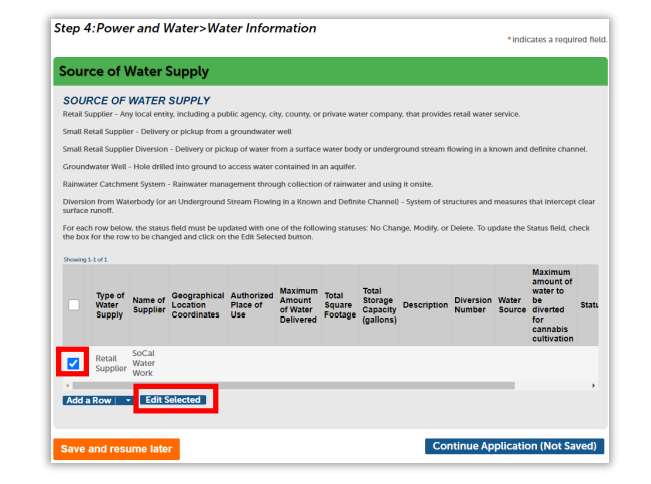
If there was a change to the water supplier, first delete the record for the existing supplier.
Select the current supplier’s row and then click Edit Selected.
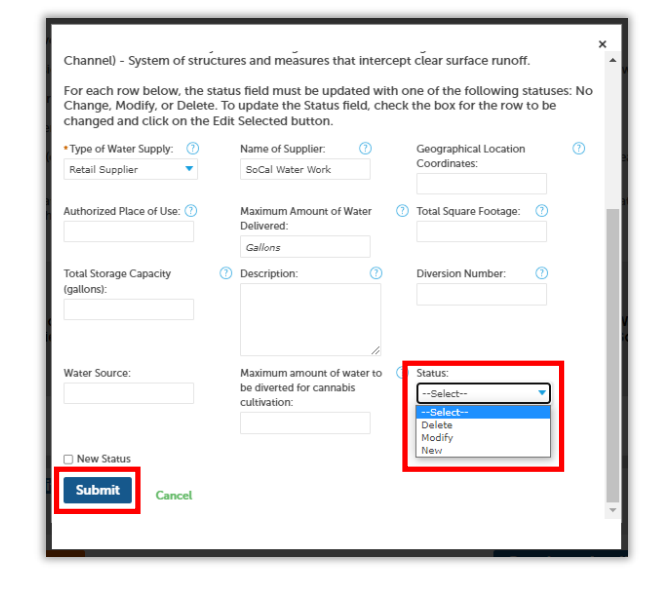
From the status dropdown, select Delete, and then click Submit.
The status of the current water source is updated to “Delete”.
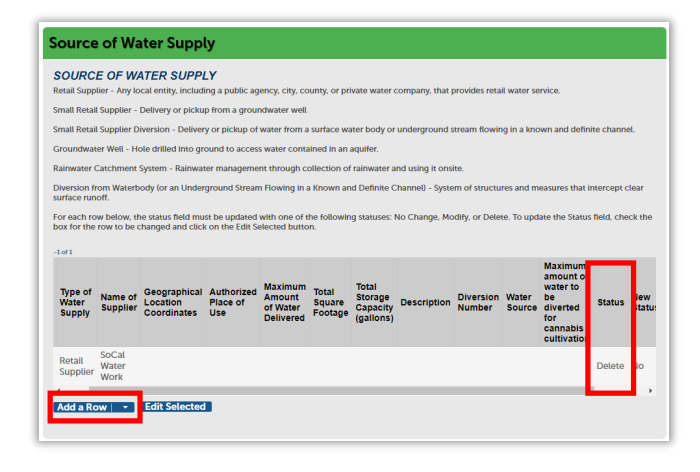
Click Add a Row to add a new water source.
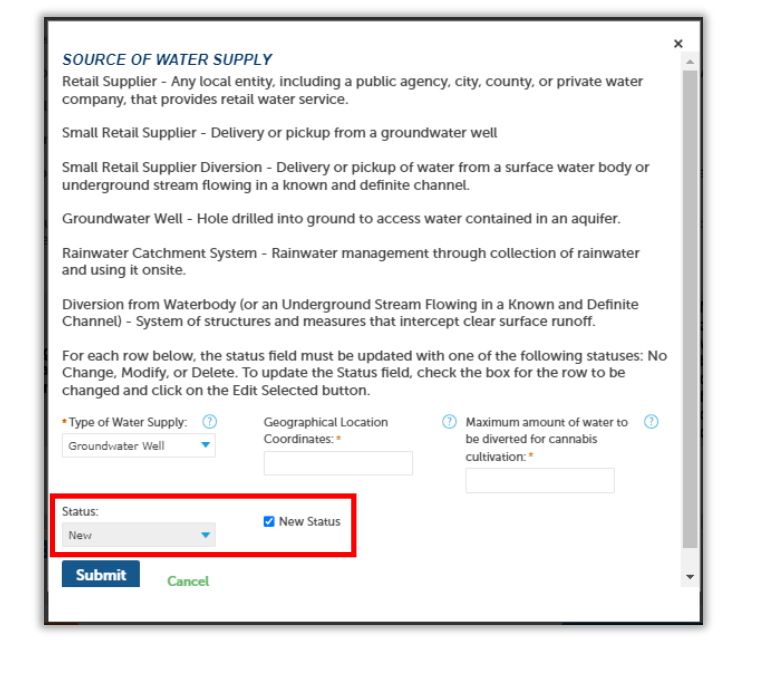
Select the type of water supply and enter the required information.
All new water supply sources automatically have the “New Status” check box selected and the status updated to “New”.
Click Submit when finished.
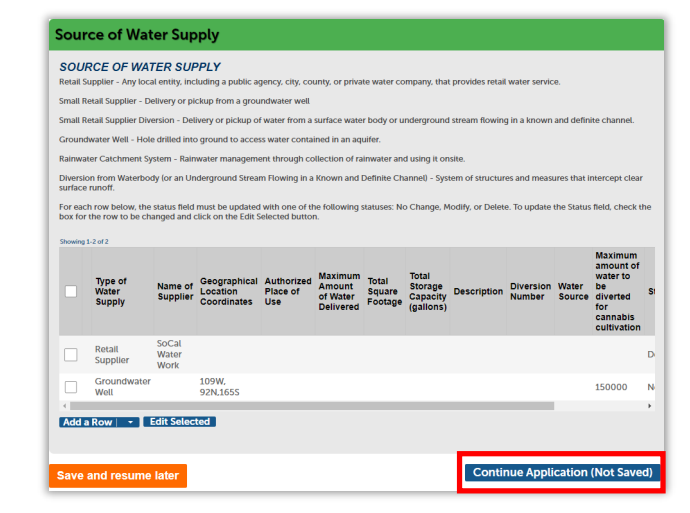
The new water source displays.
Add all water supply sources and click Continue Application to upload the necessary documentation.
Add required documents
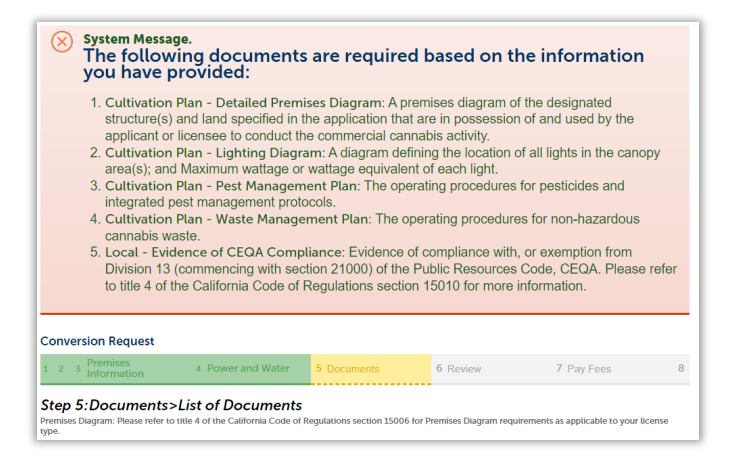
Gather these documents on your computer so you can easily add them.
You can select Save and resume later if you need to stop to assemble your attachments.
When ready, scroll to the bottom of the screen to upload the necessary forms.
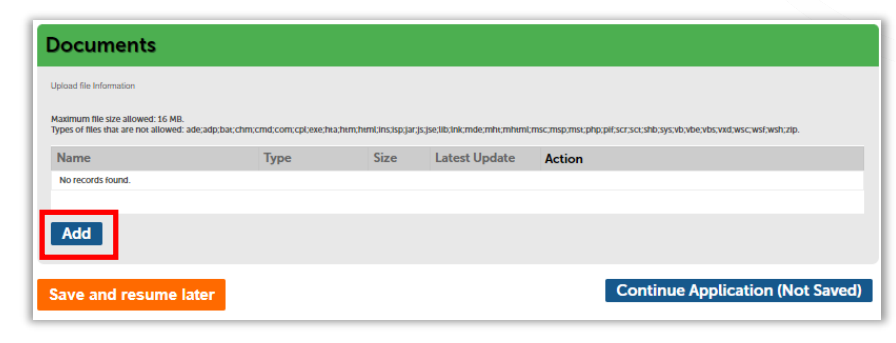
Click Add in the Documents section.
Note: Files to upload can be no more than 16 MB and can only be one of the types listed at the top of the pop-up.
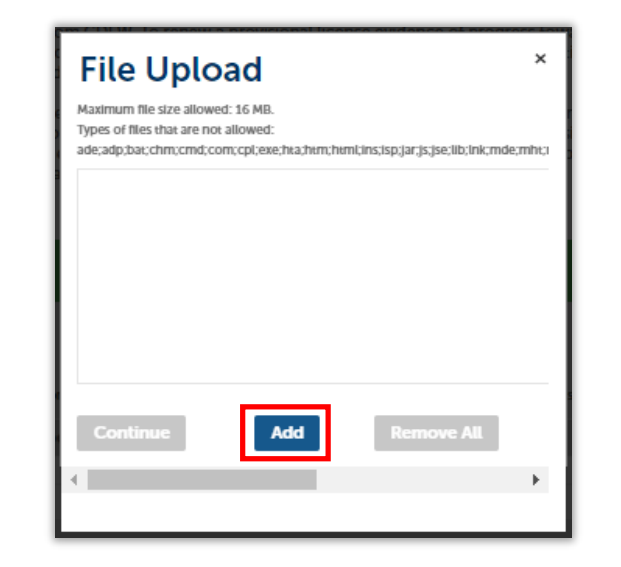
To search for and upload documents, click Add.
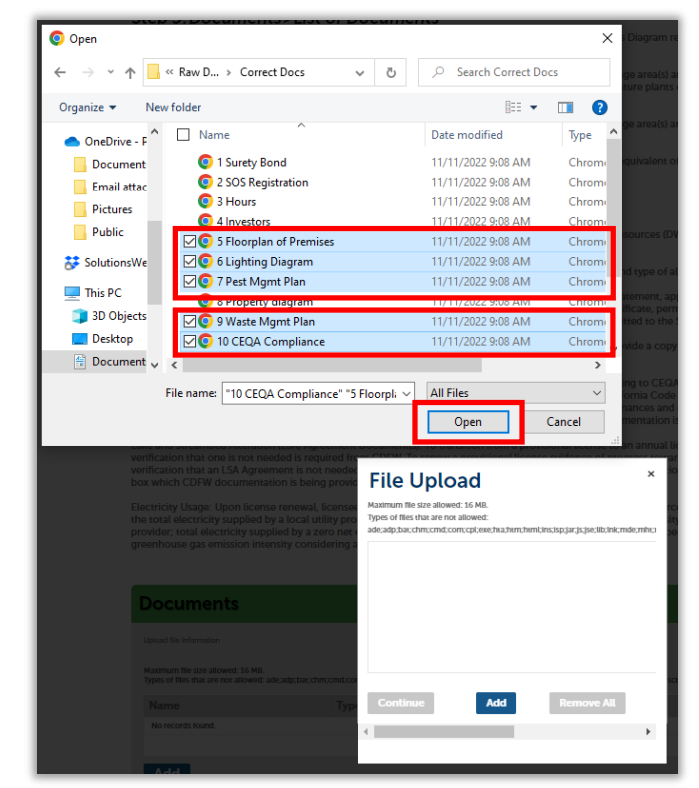
Search for and select the required documents to upload.
Click Open to add your documents to the File Upload pop-up.
Once each document is uploaded, the status displays 100%.
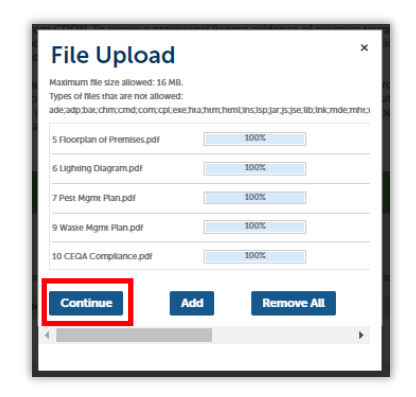
Click Continue button to add them to the Documents table.
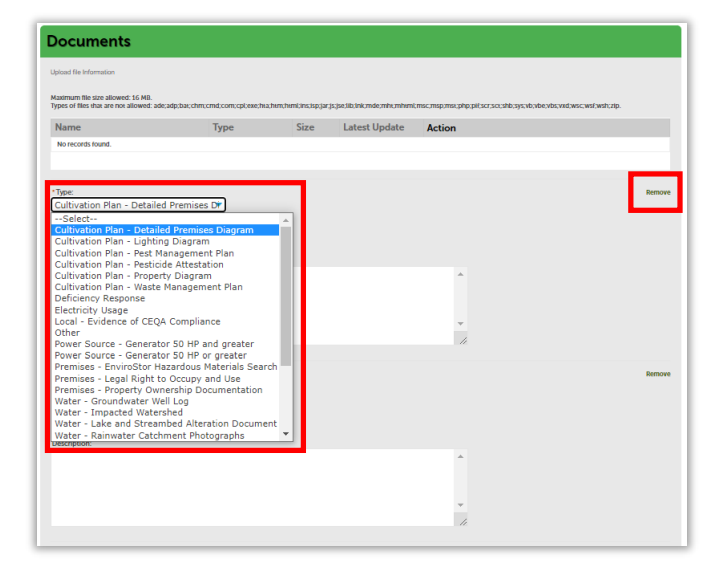
Next, select the label for the document you just attached from the Type field. This helps us understand which document fulfills which requirement. Enter any special information you need to communicate about a document in its Description field.
Note: If any document you uploaded was incorrect, you can use the “Remove” link next to it, then add the correct document in the previous screen.
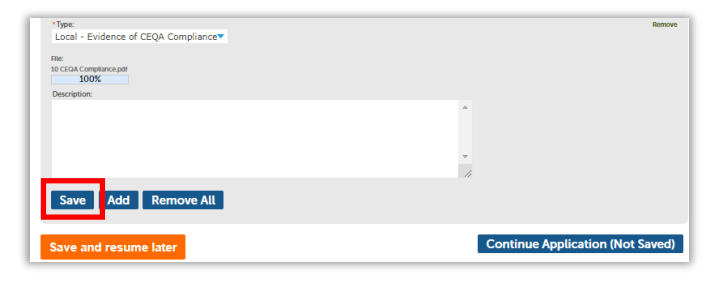
Click Save to save all uploaded documents to the Conversion Request.
A success message confirms your attachments were received.
A list of all uploaded documents displays. If needed, you can provide additional documentation after the Conversion Request is submitted.
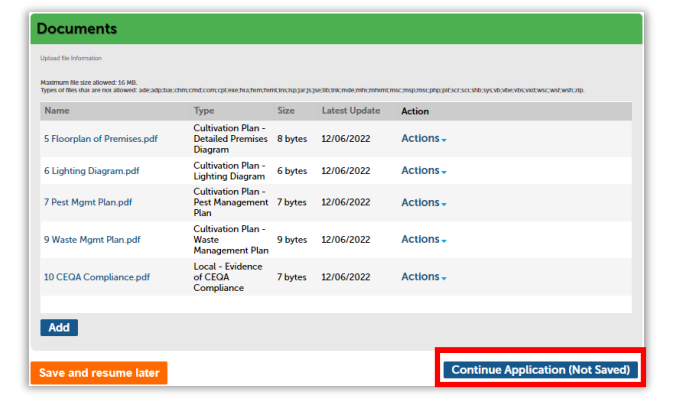
Click Continue Application to move on to the review phase.
Conversion request review section
The next screen displays a list of all the sections in which you’ve entered information so far.
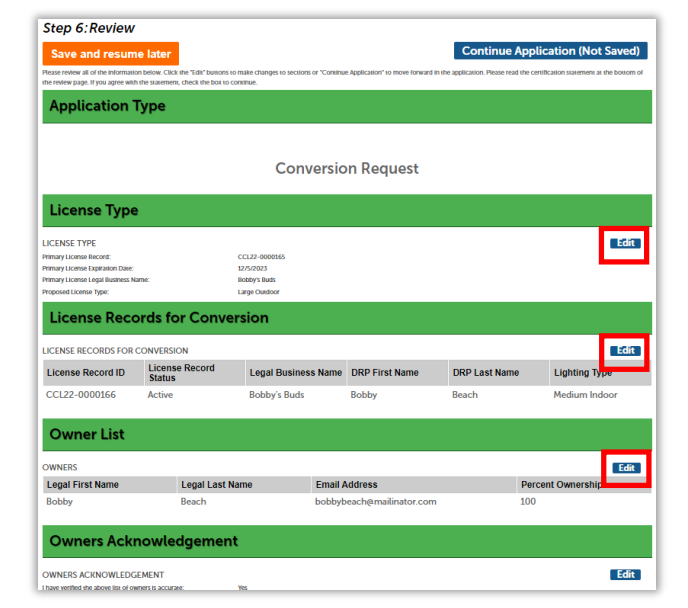
You can use the blue edit button next to each section to go back and revise your entries as needed.
At the bottom of the page is an attestation statement.
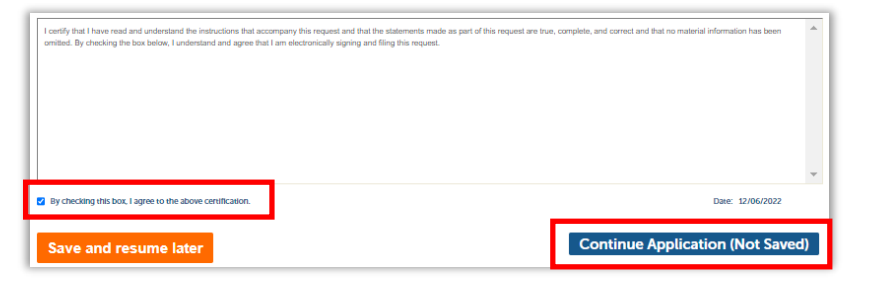
Click the checkbox to certify your Conversion Request, which automatically enters the date, then click Continue Application.
Your application is submitted.
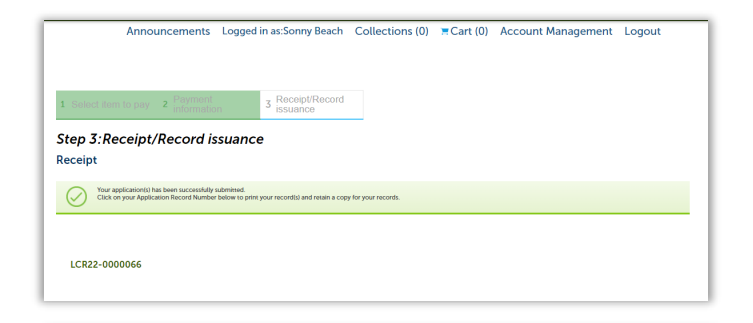
The issuance receipt will display.
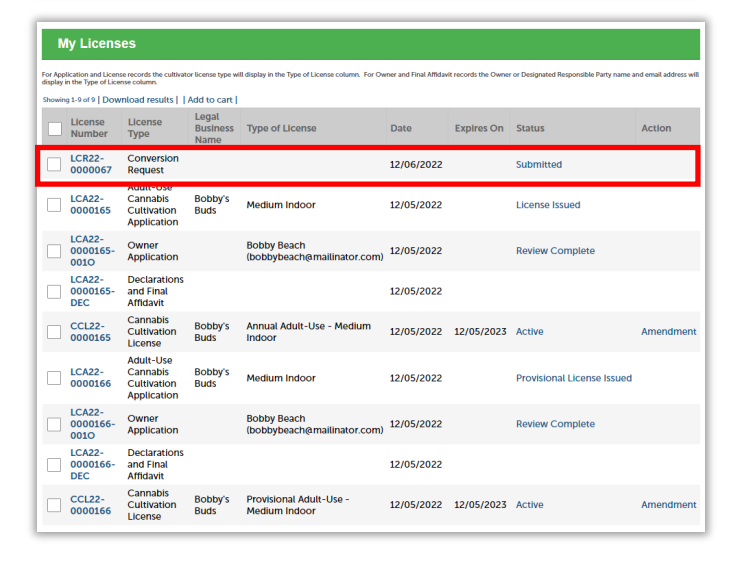
The Conversion Request status displays as “Submitted” on your licenses list.
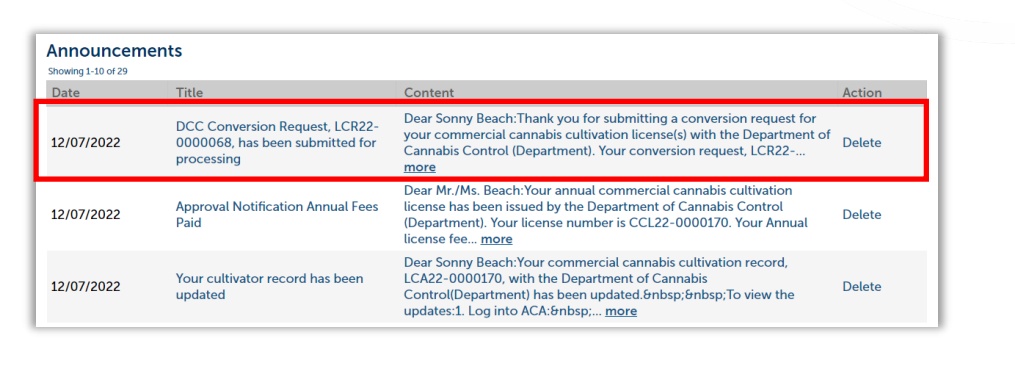
A confirmation email is sent to the address on file, and an announcement is placed on your account informing you of the successful submission.
Next steps
The Department of Cannabis Control reviews the Conversion Request and will inform you via email through a status announcement on your system home page. If any application fees are due at this time, you will receive an email notification, and the Conversion Request Status will display as “License Fee Due”.
Pay license fees
Go to the My Licenses tab. Click Pay Fees Due to pay the conversion request fees.
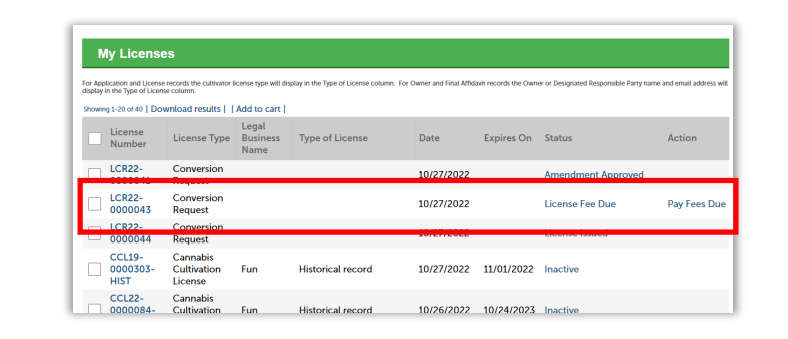
Conversion Request application fees are prorated according to the remaining time on your original license.
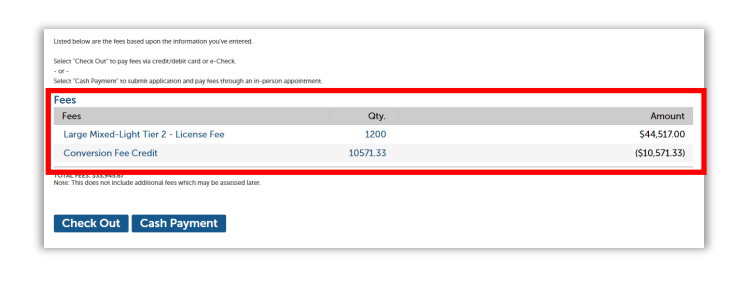
If proration has occurred, the amount will display as a conversion fee credit.
Once the review is conducted, and all applicable fees are paid, the Conversion Request status is updated to “License Issued”.
In addition:
- The Primary License Record number has been updated to “Active”, with the newly converted type displaying in the Type of License column.
- All other licenses included in the request are canceled, as the parcels are now consolidated into the converted license.
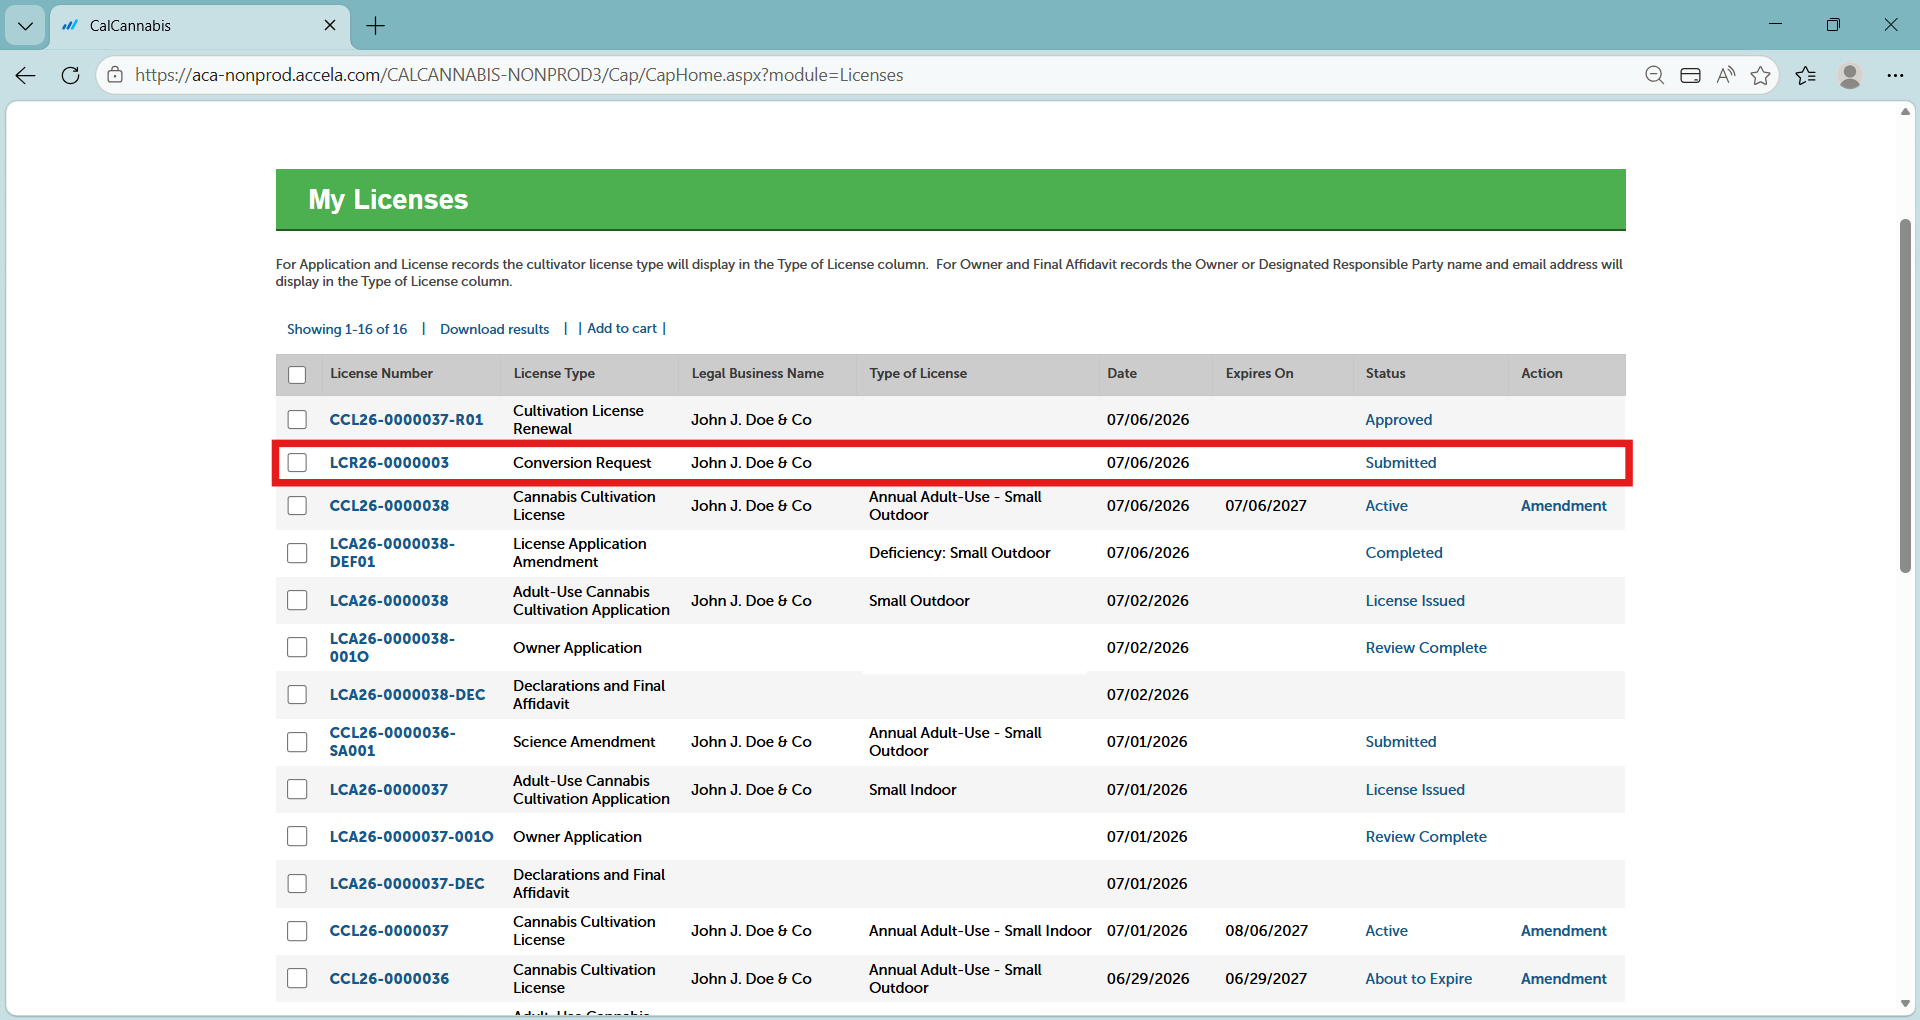
Select the active Primary License Record to print the new Converted License.
Note: Do not click on your Conversion Request. The new license certificate is only available in your Active Cannabis Cultivation License.
Print your license certificate
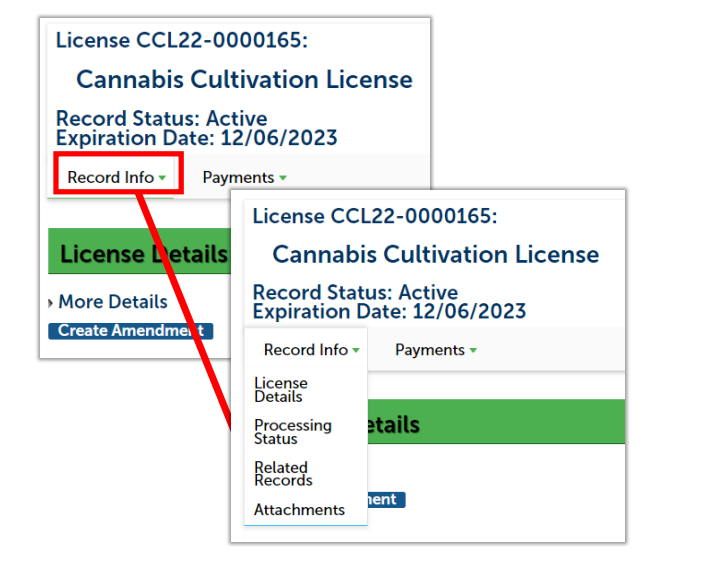
Use the Record Info dropdown list to navigate to Attachments, where you will find your license certificate.
Your license certificate document is listed in the Attachments list.
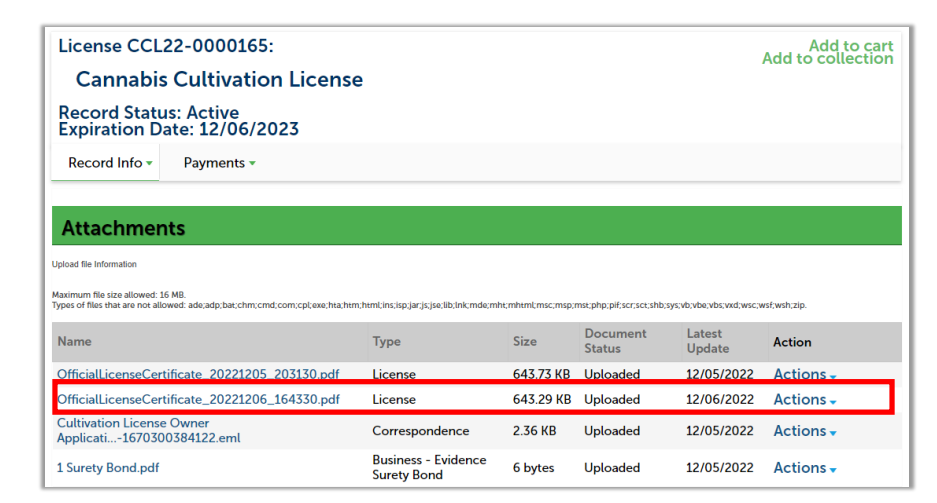
Click on the name of the PDF document in blue font to open and view the document.
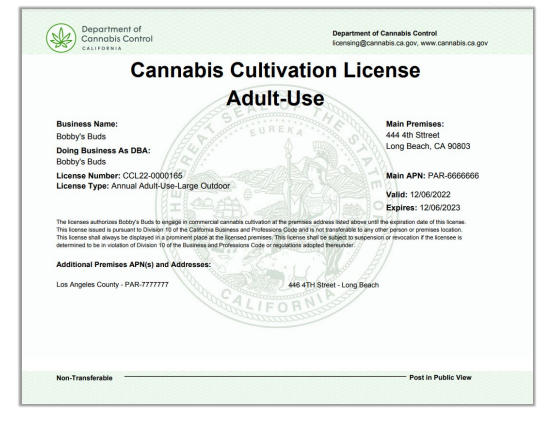
Your license certificate displays. Each premises included in the converted license displays at the bottom of your certificate.
You can print it from here.
Contact us
The best way to reach us is by email at info@cannabis.ca.gov. If you would prefer to talk to us by phone, call 1-844-612-2322.